VMware Snapshot Size Powershell Nagios Script

VMware snapshots are a fantastic feature. They can be easily created. The problem arises when they have been forgotten about. Not only do they consume disk space, they can also take a very long time to remove. The check_vm_snap_size.ps1 plugin for Nagios/Icinga was written to notify when any snapshots get over a certain defined size. While other methods exist for checking snapshot file sizes (like running a check via the service console), this plugin uses the PowerCLI interface released by VMware to present that information. When utilized along with NSClient++ it can easily report back to Nagios the size of your snapshots. Combine that with your favorite performance graphing utility (ex. Nagiosgraph) and you show the growth of your snapshot sizes.vmware-nagios-snapshot-size

While the plugin itself is fairly simple (I am no PowerShell guru) the steps to get it operate securely with NSClient++ and to minimize load are somewhat involved.

Prerequisites

Installation and Configuration

The installation and configuration of the script is fairly straight forward by itself. The difficult parts are related to optimizing your PowerCLI environment to reduce the load time. Because the script is reloaded every check interval, without optimization this can put extra load on your host. The other piece is to generate a credential file so that you are not passing username/passwords across the network needlessly.

PowerCLI Optimiziation

Because the PowerCLI is loaded every time the script is run, we want to minimized its impact on the system. One way to accomplish this is to manually compile the .Net PowerCLI XmlSerializers; doing this dramatically reduces the CPU load and startup of time of the add-in. You will only need to do this once per computer per version of the PowerCLI. A big thanks goes out to VELEMTNAL and vNugglets for the commands to do this.

The following script is what I ran on my host, it complies all known versions that might be on the host (I was lazy and didn’t really want to figure out which version I actually had). Note that this script needs to be run as Administrator (right-click and select “Run As Administrator”).

For 64-bit Operating Systems

C:\Windows\Microsoft.NET\Framework64\v2.0.50727\ngen.exe install "VimService55.XmlSerializers, Version=5.5.0.0, Culture=neutral, PublicKeyToken=10980b081e887e9f"
C:\Windows\Microsoft.NET\Framework64\v2.0.50727\ngen.exe install "VimService51.XmlSerializers, Version=5.1.0.0, Culture=neutral, PublicKeyToken=10980b081e887e9f"
C:\Windows\Microsoft.NET\Framework64\v2.0.50727\ngen.exe install "VimService50.XmlSerializers, Version=5.0.0.0, Culture=neutral, PublicKeyToken=10980b081e887e9f"
C:\Windows\Microsoft.NET\Framework64\v2.0.50727\ngen.exe install "VimService41.XmlSerializers, Version=4.1.0.0, Culture=neutral, PublicKeyToken=10980b081e887e9f"
C:\Windows\Microsoft.NET\Framework64\v2.0.50727\ngen.exe install "VimService40.XmlSerializers, Version=4.0.0.0, Culture=neutral, PublicKeyToken=10980b081e887e9f"
C:\Windows\Microsoft.NET\Framework64\v2.0.50727\ngen.exe install "VimService25.XmlSerializers, Version=2.5.0.0, Culture=neutral, PublicKeyToken=10980b081e887e9f"

If you have a 32-bit OS use

 
C:\Windows\Microsoft.NET\Framework\v2.0.50727\ngen.exe install "VimService55.XmlSerializers, Version=5.5.0.0, Culture=neutral, PublicKeyToken=10980b081e887e9f" 
C:\Windows\Microsoft.NET\Framework\v2.0.50727\ngen.exe install "VimService51.XmlSerializers, Version=5.1.0.0, Culture=neutral, PublicKeyToken=10980b081e887e9f" 
C:\Windows\Microsoft.NET\Framework\v2.0.50727\ngen.exe install "VimService50.XmlSerializers, Version=5.0.0.0, Culture=neutral, PublicKeyToken=10980b081e887e9f" 
C:\Windows\Microsoft.NET\Framework\v2.0.50727\ngen.exe install "VimService41.XmlSerializers, Version=4.1.0.0, Culture=neutral, PublicKeyToken=10980b081e887e9f" 
C:\Windows\Microsoft.NET\Framework\v2.0.50727\ngen.exe install "VimService40.XmlSerializers, Version=4.0.0.0, Culture=neutral, PublicKeyToken=10980b081e887e9f" 
C:\Windows\Microsoft.NET\Framework\v2.0.50727\ngen.exe install "VimService25.XmlSerializers, Version=2.5.0.0, Culture=neutral, PublicKeyToken=10980b081e887e9f" 

UPDATE – Apr 4, 2017
If you are using Powershell 3.0+ then you need to run a different set of commands in order to make the optimizaitons. Thanks to a comment on a VMware blog post the command you need to run for a 64-bit OS is

c:\Windows\Microsoft.NET\Framework64\v4.0.30319\ngen.exe install "VimService55.XmlSerializers, Version=5.5.0.0, Culture=neutral, PublicKeyToken=10980b081e887e9f"  /ExeConfig:%windir%\system32\WindowsPowerShell\v1.0\PowerShell_ISE.exe

Also according to another comment on the same post “This optimization is not possible and not needed any more with version 6.5+ of PowerCLI”

Credential Store Creation

The second challenge with running this script in an automated fashion via NSClient++ is related to authentication and user rights. The script has been designed to utilize the VI Credential Store features to securely save a credential file to the machine and then just pass that location in the command string so that you are not actually storing raw username and passwords or passing them across the network. The New-VICredentialStoreItem and Get-VICredentialStoreItem commandlets allow the file to be created, however the resulting saved files can only be utilized by the user account that created the file. Check out the PowerShell Article of the Week from Professional VMware for more information on secure credential storage.

By default the NSClient++ service runs as the local System account, so we need to launch a PowerCLI session as the System account if we want to utilize this feature.Thanks to a post on Ben Parker’s Blog called How do I run run Powershell.exe/command prompt as the LocalSystem Account on Windows 7? we have the answer. The trick is use PsExec from Microsoft/Sysinternals. Even though Ben’s blog post is specific to Windows 7 the process works just fine on Windows Server 2008 R2.

  1. Download PsExec from Microsoft
  2. Run PsExec from a command prompt as follows: psexec -i -s Powershell.exe this will open a new window
  3. In the new PowerShell console window type whoami and it should respond with NT AUTHORITY\SYSTEM
  4. Create the XML Credential file by running New-VICredentialStoreItem -host 'host.example.com' -user 'username' -password 'pword' -file c:\hostname.xml substiuting the correct server, user, password and file locations. Note that the location you choose should have the necessary security rights applied.

NSClient++ Configuration

In order to make this script work with NSClient++ you must first make sure that your nsclient.ini is configured for external scripts and NRPE, additionally you need to enable support for argument passing and to allow for nasty meta chars (this last step may not be needed) for the scripts. Assuming you have placed the check_vm_snap_size.ps1 script in the NSClient++ scripts folder then should add the following to the [/settings/external scripts/scripts] section of the config file.

Two things to note, first this should all be on one line it is shown as wrapped to easier reading. Second the last dash - is required.

check_vm_snap_size = cmd /c echo scripts\\check_vm_snap_size.ps1 -hostname $ARG1$ -crit $ARG2$ -warn $ARG3$ -credfile $ARG4$ -hostexclude $ARG5$ -guestexclude $ARG6$; exit($lastexitcode) | powershell.exe -command -

Nagios Configuration

The Nagios configuration is pretty straight forward. The check utilizes the check_nrpe command for passing the request to the host. The following is an example of the configuration for the checkcommands.cfg portion.

define command {
command_name  check_vm_snap_size
command_line  $USER1$/check_nrpe -H $HOSTADDRESS$ -t 45 -c check_vm_snap_size -a $ARG1$ $ARG2$ $ARG3$ $ARG4$ $ARG5$ $ARG6$
}

For the services check you will need to create something like the following, the last two arguments are optional and they refer to hosts and guests that you might want to exclude from the results. The other thing to note is that both the check_nrpe command and the NSClient++ configurations require that all backslashes be escaped because they are special characters, therefore for each single backslash in your path to your credential file you must enter four backslashes in the service check config.

define service {
service_description  VMware Snapshot Size
host_name            hostname
check_command        check_vm_snap_size!vcenterserver.example.com!1024!512!c:\\\\credfile.xml!excludehost.example.com!excludeguest
use                  generic-service
contact_groups       vm-admins
}

Known Issues/Limitations

  • While the check_vm_snap_size.ps1 script supports passing an array for both the hostexclude and guestexclude parameter options, that functionality does not yet work when sending via check_nrpe. You can specific a single host and a single guest, but not multiple.

Misc Notes

You may need to enable set-executionpolicy for both 64 bit and/or 32 bit PowerShell depending upon which version of NSClient++ you have installed.

To Do

The script still needs internal documentation written, as well as hopefully finding a solution to all of the known issues


The Script

Save the following as check_vm_snap_size.ps1

param ( [string] $Hostname = "",
 [double] $crit = 100,
 [double] $warn = 50,
 [string] $CredFile,
 [string] $HostExclude =@(""),
 [string] $GuestExclude =@(""),
 [switch] $help
)
$countLargeSnap = 0
$critcount = 0
$warncount = 0
$snapcount = 0
$crittsize = 0
$warntsize = 0
$snaptsize = 0
$LargeSnapNames = ""
$critSnapNames = ""
$warnSnapNames = ""
 
# parameter error checking
if ( $warn -ge $crit) {
 Write-Host "Error - crit vaule must be larger than warn value" -foregroundcolor "red"
 exit 3
}
if ( $Hostname -eq "") {
 Write-Host "Error - Hostname must be specified" -foregroundcolor "red"
 exit 3
}
 
#load VMware PowerCLI
add-pssnapin VMware.VimAutomation.Core -ErrorAction SilentlyContinue
 
# If no credential file specific use the account permission from the user running the script
# otherwise use the credential file to get the host, user, and password strings
if ($CredFile -eq "" ) {
 Connect-VIServer -Server $Hostname -WarningAction SilentlyContinue > $null
}
else {
 $creds = Get-VICredentialStoreItem -file $CredFile
 # check to see if the hostname specific matches hostname in credential file
 if ( $Hostname -eq $creds.Host) {
  Connect-VIServer -Server $creds.Host -User $creds.User -Password $creds.Password -WarningAction SilentlyContinue > $null
 }
 else{
  Write-Host "Unknown - Hostname specific does not match hostname in credentials file" -foregroundcolor "red"
  exit 3
 }
}
 
if ($global:DefaultVIServers.Count -lt 1) {
 write-host "Unknown - Connection to host failed!"
 exit 3
}
 
# Get the list of snaphosts to evaluate from the host, excluding hosts and
# guests if defined
$snapshots = get-VMhost | ?{$HostExclude -notcontains $_.Name} | get-vm | ?{$GuestExclude -notcontains $_.Name} | get-snapshot
 
# Loop through each snapshot and see any sizes exceed the warning or crital
# thresholds. If so then store their names and sizes. Could put into an array
# but that is for another day.
foreach ( $snap in $snapshots ) {
 $snapcount++
 $snaptsize = $snaptsize + $snap.SizeMB
 if ( $snap.SizeMB -ge $warn -and $snap.SizeMB -lt $crit ) {
  $warncount++
  $wVMName = $snap.VM
  $wVMSize = $snap.SizeMB
  $warntsize = $warntsize + $snap.SizeMB
if ( $warnSnapNames -eq "") {
    $warnSnapNames = "${wVMName}:${wVMSize}MB "
    }
   else {
    $warnSnapNames += "${wVMName}:${wVMSize}MB "
    }
 
        }      
  elseif ( $snap.SizeMB -ge $crit  ) {
   $critcount++
   $cVMName = $snap.VM
   $cVMSize = $snap.SizeMB
   $crittsize = $crittsize + $snap.SizeMB
   if ( $critSnapNames -eq "") {
    $critSnapNames = "${cVMName}:${cVMSize}MB "
    }
   else {
    $critSnapNames += "${cVMName}:${cVMSize}MB "
    }
 }
}
 
if ( $critcount -gt 0 ) {
 Write-Host "Critical -" $critcount "VM's with snapshosts larger than" $crit "MB :" $critSnapNames "|snaps=$snapcount;$warncount;$critcount;; ssize=${snaptsize}MB;$warn;$crit;;"
 exit 2
}
elseif( $warncount -gt 0 ) {
 Write-Host "Warning -" $warncount "VM's with snapshosts larger than" $warn "MB :" $warnSnapNames "|snaps=$snapcount;$warncount;$critcount;; ssize=${snaptsize}MB;$warn;$crit;;"
 exit 1
}
if ( $critcount -eq 0 ) {
 Write-Host "OK - No VM's with snapshosts larger than " $warn "MB" "or" $crit "MB" "|snaps=$snapcount;$warncount;$critcount;; ssize=${snaptsize}MB;$warn;$crit;;"
 exit 0
}

Script commands via SSH – Sonicwall

I had the need to script some configuration in our Sonicwall firewall, so I went looking for a way to do this. I found a solution to configure via SSH here, but I needed to add some additional switches to make it work. Here is an example that does work.

(echo -e 'admin\npassword'; sleep 2; echo 'show interface X2'; sleep 2; echo logout; sleep 2) | ssh -t -t admin@X.X.X.X

Update: I recently tried using this again, and found that it didn’t quite work. I had to change it to the following:

(echo -e 'admin'; sleep 2; echo 'npassword'; sleep 2; echo 'show interface X2'; sleep 2; echo logout; sleep 2) | ssh -t -t admin@X.X.X.X

Fixing Windows Server 2008 R2 and Server 2016 Boot Problem

Update July 26, 2020
Eight years later this post proves useful once again. During a failed VMware tools upgrade, we had a similar problem as all of those years ago. At first the procedures below didn’t work, but once we remembered that the recovery media (DVD or recovery partition) would not have the VMware Paravirtual SCSI (PVSCSI) driver. Things then fell into place.

In order to get the drivers loaded we mounted the VMwtools ISO /vmimages/tools-isoimages/windows.iso and booted into the recovery partition. Then from the command prompt we loaded the pvscsi driver by using the following drvload "D:\Program Files\VMware\VMware Tools\Drivers\pvscsi\Win8\amd64\pbscsi.inf". Where D was the drive letter of of mounted ISO. Not sure if the next step was necessary, but we ran diskpart and then rescaned for drives. Once it saw all of the drives we were able to use BOOTREC /FIXMBR, and BOOTREC /FIXBOOT. Rebooted and things were good.


I was playing around with a couple of Windows Server 2008 R2 virtual machines today, and accidentally messed up the boot records somehow. After playing around with a number of partition and disk recovery tools. I finally ran across this post called Windows Server 2008 R2 always boots into recovery console that had a solution that worked for me even though my problem was different. I wanted to record the steps I used so that I could find them later.

I used their Method 2 which worked for me. here are the steps:

  1. Put the Windows Server 2008 R2 installation disc in the disc drive, and then start the computer.
  2. Press any key when the message indicating “Press any key to boot from CD or DVD …”. appears.
  3. Select a language, time, currency, and a keyboard or another input method. Then click Next.
  4. Click Repair your computer.
  5. Click the operating system that you want to repair, and then click Next.
  6. In the System Recovery Options dialog box, click Command Prompt.
  7. Type bootrec /RebuildBcd, and then press ENTER

Update – April 10, 2017
Last night we had a similar problem, but unfortunately the above steps did not correct the problem. After doing bootrec command it found the boot records, but still didn’t work we then tried running x:\sources\recovery\StartRep.exe which finally resolved our problem.

They also offered up another method to try, but I didn’t need to go that far but here is as well for future reference.

  1. Put the Windows Server 2008 R2 installation disc into the disc drive, and then start the computer.
  2. Press a key when the message indicating “Press any key to boot from CD or DVD …”. appears.
  3. Select a language, a time, a currency, and a keyboard or another input method, and then click Next.
  4. Click Repair your computer.
  5. Click the operating system that you want to repair, and then click Next.
  6. In the System Recovery Options dialog box, click Command Prompt.
  7. Type BOOTREC /FIXMBR, and then press ENTER.
  8. Type BOOTREC /FIXBOOT, and then press ENTER.
  9. Type Drive:\boot\Bootsect.exe /NT60 All, and then press ENTER.

They also note that the Drive in step 9 is the drive where the Windows Server 2008 R2 installation media is located.

Hopefully I’ll never need to use this again, but if I do now it is documented. Also there is KB article #927392 on Microsoft’s site called How to use the Bootrec.exe tool in the Windows Recovery Environment to troubleshoot and repair startup issues in Windows that details the different options as well.

Insanely Great – made-in-USA iPhone accessories

Insanely Great iphone AccessoriesMy longtime friend and mentor Richard V. Ford just launched his new company, Insanely Great Products.

They sell a selection of iPhone and iPad accessories and mounts, all made by hand in the USA from US sourced parts. So if you’re looking for something to hold your iPhone and want to support products made here in the states, stop by and check out there site.

Sonicwall – 552 MS-Office file containing VBA macros found inside of the email

We were having clients say that they were unable to send us emails containing VBA macros. After spending at least 45 minutes checking all of our usual suscpects, I finally got a copy of the error message the client was getting, and they forwarded me the following error: 552 MS-Office file containing VBA macros found inside of the email.

At this point it I realized it was not coming from our mailhost. I quick bit of googling and I found that this was being blocked at the firewall level. It appears that Sonicwall firewalls when they have enabled the Gateway AV security service will block VBA macros as an option. It is a configuration option to enable or disable.


Snow, Snow, and More Snow

Here are a couple of shots from this past weeks two blizzards.

The first image is from Feb 6, 2010 where Elkridge, MD got 38″ of snow. We measured 31.5″ before our measuring stick got lost in the snow. If you click on the image it will take to a panorama where you can view our neighborhood.

Panorama of the Feb 6, 2010 Blizzard

This image is from Feb 11, 2010 after the second blizzard to hit us. Click on the picture to see a larger image.

Open Systems SnapVault (OSSV) Web Reporting

Open Systems SnapVault (OSSV) is a data replication/protection software from NetApp. OSSV runs on Windows, UNIX/LINUX, and VMWare ESX servers and it replicates block level changes back to a NetApp filer. We use this technology to replicate the data on all of branch office servers back to our datacenter. This replication allowed us to remove the need to perform tape backups in each branch office.

One of the strengths of OSSV is its simplicity, but that is also it’s weakness. The reporting and monitoring capabilities of OSSV can be cumbersome. You can get a lot of status information from the filer itself via the snapvault status command. However, the one thing that you can’t tell from filer is how far along the process is. That information is only available when the snapvault status -l command is run on the primary system (your Windows/UNIX/VMWare server). With windows that means that you either need to get either console access (via. Remote Desktop, VNC, etc.) or command line access with something like PsExec.

We’ve been running this way for almost two years, but I finally got tired of all of the typing. So I developed a web based reporting tool that gathers all of information and presents it in a nice graphical clickable interface.

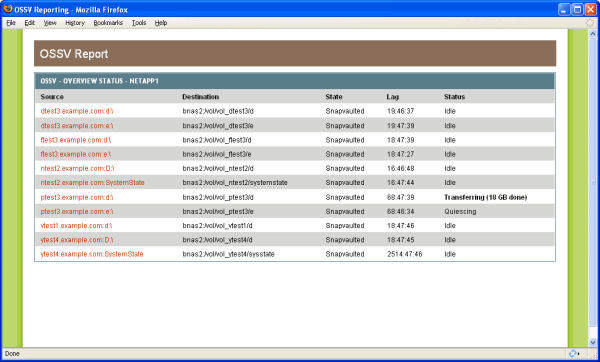
The front screen of this php web application displays the status of all currently configured snapvault relationships. It does this by executing the snapvault status via an encrypted ssh key-based session to the filer. The resulting output is shown below.

OSSV Web Reporting Overview Screen

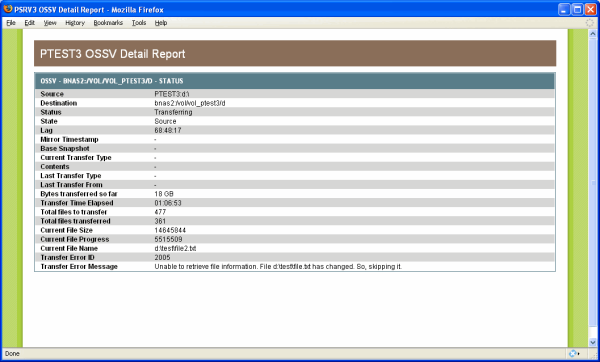
For each specific qtree you can click to get the detail about that status of that relationship just as if you had run the snapvault status -l command on the primary server. Thereby showing you how many files have been transferred, how far along you are on the current file and what errors have been encountered. All this is accomplished via winexe linux command. Winexe remotely executes commands on WindowsNT/2000/XP/2003 systems from GNU/Linux just like PsExec does from windows.

OSSV Server Detail Web Report

If anyone is interested in using this, I can supply you with my really ugly code. Finally a big shout out the phpSysInfo project from where I borrowed the CSS styling.

Update: I’ve finally put the code online for anyone to access.  You can download the original code from my box.net account. Get the ossvreport.zip file.

Update 2: Box.net is no longer allowing easy public access so I’ve put it up on dropbox.com and you should be able to get the ossvreport.zip file from there now.

Virtualization Gripes (part 1)

Virtualization is not new, it has been around for a number of years. So why are so many software vendors afraid of it, and even worse hostile to it? We run a number of different application that have license managers for their software. These license managers are often a service and sometimes a hardware lock / dongle that runs on a server that all of the clients connect to for permission to use the software.

We’ve successfully virtualized many of these servers (they are great candidates because they are so often extremely under utilized when on physical boxes). The ones with hardware dongles pose some problems (I’ll save that for another post). Then along comes a product from ETAP. They will let you virtualize their application (which is extremely resource intensive), but they prohibit (i.e. software won’t run) you from virtualizing their license manager. This is completely insane! Their silly little license manager use very little memory, and almost zero CPU cycles. In our case it may handle one or two requests for a license a day (if that), and I have to install it on a physical box. What a PIA. 

In a plea to all software developers, “you have nothing to fear from allowing your software to be virtualized.” We are not trying to steal your software, we’re just trying to maximize our investment. Let alone allow us to be better prepared for disaster recovery. In fact, by making it difficult/impossible to virtualize is going to cost you money in the long run as I will strongly denounce your product and actively push our company (and others I deal with) to avoid your products and find alternatives that support virutalization.

Virtualization Begins

For about the past nine months I’ve been working on growing the use of virtualiztion within my firm. We had dabbled with virtualizing a couple of misc. application/development servers with the first release of VMWare Server, but I knew that in order to consolidate the rest of environment, as well as better prepare us for disaster recovery that we needed to expand our server virtualization strategy. The solution that made the most sense at the time was a VMWare Infrastructure solution utilizing their ESX platform.

The question was how to move forward without spending tons of money (and avoiding all of the politics involved in deploying a solution). The solution arose through the timing on our computer leases. We lease the majority of our computer equipment for three years. It just so happened that as I was looking to move forward, one of our major leases came up for replacement. To make it even better, not only did I have three servers that were due for swapping (and great candidates for virtualizing), but three years earlier we were forced in to ordering a large batch of workstation class computers. This time, with the advancement of technology, we no longer needed that class of machine.

With my good fortune, I was able to replace the three servers with two new servers (albeit much beefier units) along with the full ESX suite for both, and workstations with much better (thanks to Intel’s Core2Duo chips) desktop class units for basically the same monthly payment we already spending. It was a really win-win for company.

In some upcoming posts I plan to highlight our journey, cover some of the sites that helped us to get where we are, discuss where we are going, and finally highlight some of the difficulties and frustrations that we still face.

Same Site – New Location

After years of hosting my own site, I’ve finally decided to move my blog to a hosted solution. You can now find my Nerhood Weblog at https://nerhood.wordpress.com/. I’ve moved all the content, and almost of the comments. If you read my site via my RSS feed it too stays the same at http://feeds.feedburner.com/nerhoodweblog/.

If you have linked to my site in the past, please update links to the new location. I will be keeping the old site alive and redirecting the traffic for a little while.

Hopefully with the change in site I’ll start posting some again. One thing that I do keep updated is my Del.icio.us links so check the out for the last things that I’ve found.